Hey guys! Sorry it took me forever to get this done but I screwed up and forgot to screen shot one part so I had to do a bunch of it over. -.- Anyway, lol, here is the second half! If you missed the first part check HERE to start.
We left off with you having a few layers of different lashes of slightly different size, rotation, etc. At this point you want to erase any parts that might leak over the bottom edge of the eye or too far outside of it, etc. Basically just clean it up. Then go to the individual layers that are NOT part of the lashes you created and click the eyeball to hide them. If you chose to use the Eloh files that have a million billion layers this is gonna take a long time lol. There is probably a faster and easier way to do it but this is how I do it. Keep the base color and the eye shading layers because chances are you are going to dislike the first attempt you upload and you'll want to go back and try again and you'll need the eye areas for markers or whatever.
Save this! Always save! xD At this point you should have the lash layers you created and a couple of the most necessary layers left. Make sure all are hidden EXCEPT the lash layers you created. Then you need to go to Image-Merge Visible Layers.
A menu will pop up, make sure to check the boxes "Clipped to image" and "Discard invisible layers." After they are merged go to Image- Transform- Flip Horizontally.
Next go to Select-All and then Edit-Copy.
Next go to Edit- Undo Select All, *then* Undo Flip Image *then* Undo Merge Visible Layers. Now select on your top most layer and click Edit-Paste as New Layer. When all that is done save it.
Then do merge visible layers again, the same way as above, and then save it as a .tga file. Make sure not to save the merged image without saving an .xcf file with all the layers first or else when you want to make changes you have to start all over and that's no fun. :/
After all of this is done go into SL, upload the texture (textures uploads are 10L but on some viewers, like Firestorm, you can upload a temporary texture for free that will disappear from your inventory eventually but is good for trying things out before paying to upload them) and create a new tattoo layer in your inventory (it's in the create new clothing menu.) Go into edit appearance and edit the tattoo layer by dropping this texture on the slot for "head." Don't worry about the other slots. Save it and there is your brand new eyelash tattoo layer! You may have to try this several times to get it positioned just the way you want but in the end it's worth it to be able to make your own custom product from scratch! If you have any further questions feel free to IM me! It might take me a while to get back because I have a little kid who needs me, haha, but I will get back eventually.
Showing posts with label Tutorials. Show all posts
Showing posts with label Tutorials. Show all posts
Wednesday, January 11, 2012
Tuesday, January 10, 2012
Part One of How to Make Tattoo Lashes in Gimp: Fast, Free, Easy, Fun!
OK! So I am not the best eyelash maker ever but I do it well enough where I think I can help others get a start in creating them. I am going to have to do this post in more than one part because it's long! I am going to post this as if you know zero about creating. So for those who know a little bit I apologize for things that might seem super easy to you. Everyone has to learn somehow! If you don't already have these you will need to go to these sites to get what's required:
1.Gimp- The program we will use to create everything in this tutorial.
2.Eloh's skin templates or any skin template you have made or have rights to. The Eloh templates are free and full perm for anyone who wants to use them. Some of the templates are ten trillion layers, some are only one flat .tga file, choose whichever one you feel like using, it doesn't matter for this.
Once you have downloaded all that stuff and are ready to rock open Gimp, go to File and open up the Eloh skin files. Left click on top most layer of the .psd (if you don't see the layer tab as shown in the photo below and are freaking out, calm down. xD Just click on Windows- Dockable Dialogues- Layers and it should pop up.) Go to Layers- Create New Layer and name it something you'll remember, mine is "lash1" or something like that. Make sure the "layer fill type" is checked as transparency.
Now, there are lots of websites that let you buy your own brushes for Gimp and even some that will give them away free for personal use; this tutorial, however, will show you how to make them with the crappy default brushes Gimp gives you. :D In your toolbox area select the paintbrush and choose one of the slanted "calligraphy" brushes. Paint one medium-ish sized line on the very corner of the eye. (This is why we are using a real skin template; we need to see the eye for better placement!)
Next go back to brushes and choose the regular old circle and choose a small-ish size to erase the line to the thickness from bottom to top that you like. Some people like smaller, wispier lashes and some like thicker Tammy Faye-esque ones, doesn't really matter. Next go to Filter-Distort-IWarp like we did HERE in the photo editing tutorial I did last time. Bend the lash a bit in the middle and just kind of mess with it until you get a curve you like.
Now you should have a cute little curved lash poking out the side of your eye. :D Next go to Layer- Duplicate Layer to get an identical copy of this lash in the exact same spot. Go to the toolbox again and choose the Move tool, which looks like 4 direction arrows. Make sure to select move the active layer/path/whatever you are working on or else it will just move whatever layer is under your mouse, bleh. Move this duplicate lash over and maybe down a little bit to create a second lash.
Now merge this duplicate layer down into the first layer by going to Layer-Merge Down. Then create a duplicate layer of *this* layer.
O.K. If you haven't already done this now is the time to SAVE. Go to File and Save As something like My Own Eyelashes, or whatever you like to call it, and for these purposes choose to save it as an .xcf, or Gimp, file. Also you can totally delete unnecessary layers from the Eloh template to make the file not as huge and scary. Moving on. Do the above steps a couple of times, creating more than one layer of slightly different lashes, until you get a basic sort of line-up of how you want the lashes placed. You can go to the toolbox and select the rotate tool on some new lash layers and rotate them to fit the eye shape.
So SAVE THIS. That's the end of the first part! The second part will come in the next day or two. I would do it all at once but if I post any more pictures on this post it will clog the feeds and be super long and make people mad. So for now take a break and we'll finish in a bit!
Sunday, January 8, 2012
IWarp Tutorial For Gimp
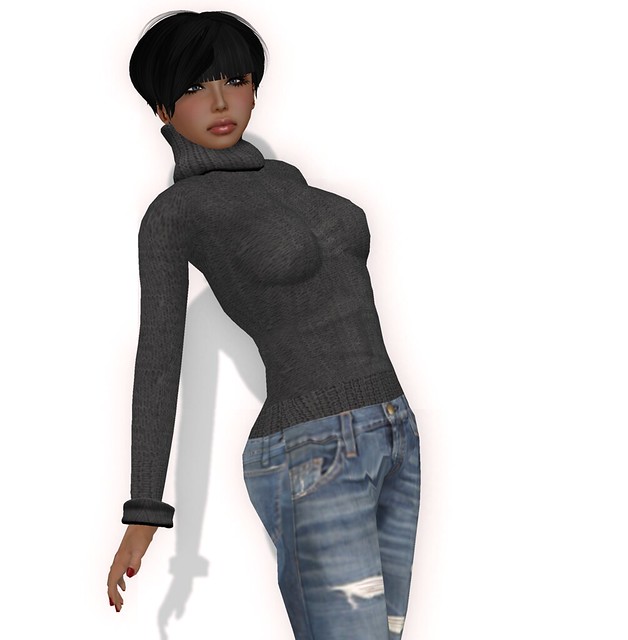
Hi all! The other day Eden and I were talking about things we love about blogging and the biggest one is helping people; helping customers find new stores, find affordable items when on a budget, help store owners get more traffic, etc. We decided another way to help people would be to do tutorials! Now none of us claim to be the best bloggers ever but I firmly believe that everyone in life has something to teach someone else and something of value to offer if they dig deep enough. So, with the small amount of skill I have, I bring you my first tutorial! Here is the unedited, direct from SL shot. As you can see, there are lots of pointy looking bits because the SL mesh sucks so hard and makes us look all straight and sharp and stuff.
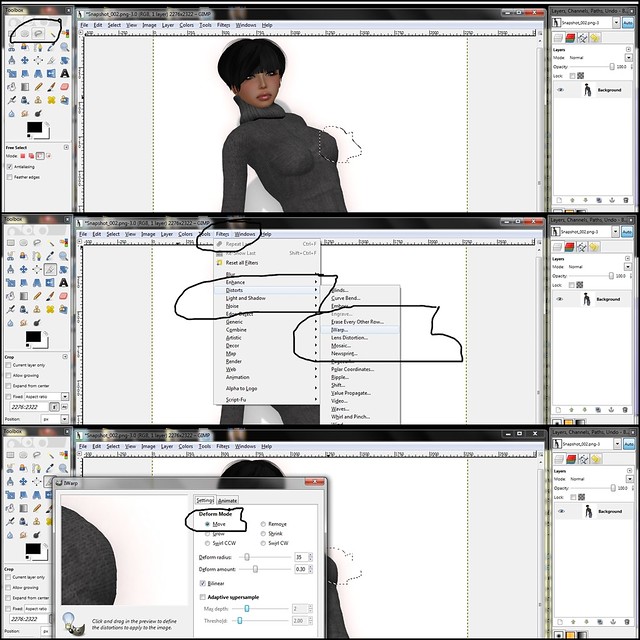
So first I take the lasso thingy tool and draw around the area I want to edit, in this case the boob, because boobies really should never be sharp. :D Next I open the "Filters" drop down menu and go to "Distorts" and then finally select "IWarp." A new box will pop up with the image of what you lassoed on the left and a bunch of sliders and stuff on the right. There are a lot of options but for this we should check "Move." My picture was over 3000 pixels so for that tiny area I had to move the slider up to 35 radius. Mess around with it to find which number works better for your picture size, etc. All you do then is "push" the pointy parts gently inward with the mouse to make it look rounder. If you need to see this image closer just click it to get to my Flickr.
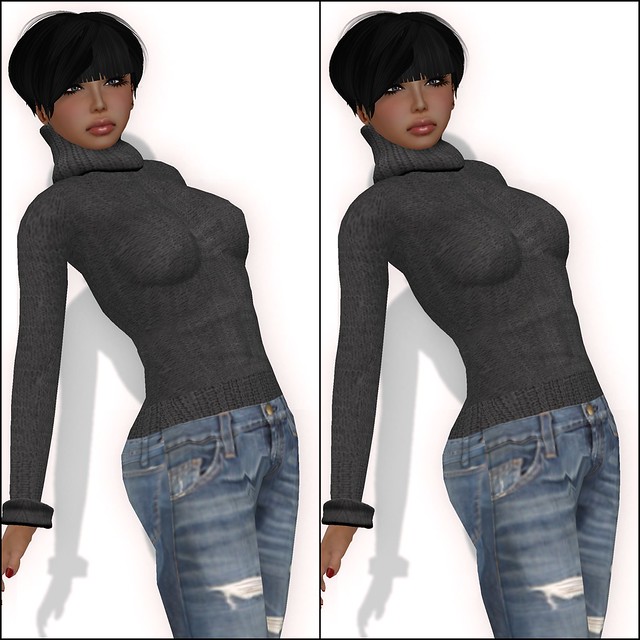
I did this on a few different parts of the body. It's just a little thing but when a picture is done it can make a big difference! The picture on the left is the before and the right is the after. I edited it enough so that there weren't too many scary, sharp spots but not so much that it actually distorts what the product, shape and avatar in general look like. Like I said, this is just a small change but in the future we will bring you more tutorials and combined maybe we can all learn together and do some cool stuff! Forgive me if this sucked, I am still learning. xD Let me, Sileny Noel, or any of us here at Free*Style know if there is anything you want covered and, don't forget, there is no such thing as a stupid question!
Worn:
Shape: Quintessencia, 1L
Sweater: Quintessencia, comes with vest (not worn), colors are 50L-100L
Pants: Milk Motion
Skin: Cherry Girl
Hair: Pomme d' Amour
(Hair is worn with bangs from a different hair style by Alice Project)
Nail Polish Layer: RezIpsa Loc

So first I take the lasso thingy tool and draw around the area I want to edit, in this case the boob, because boobies really should never be sharp. :D Next I open the "Filters" drop down menu and go to "Distorts" and then finally select "IWarp." A new box will pop up with the image of what you lassoed on the left and a bunch of sliders and stuff on the right. There are a lot of options but for this we should check "Move." My picture was over 3000 pixels so for that tiny area I had to move the slider up to 35 radius. Mess around with it to find which number works better for your picture size, etc. All you do then is "push" the pointy parts gently inward with the mouse to make it look rounder. If you need to see this image closer just click it to get to my Flickr.

I did this on a few different parts of the body. It's just a little thing but when a picture is done it can make a big difference! The picture on the left is the before and the right is the after. I edited it enough so that there weren't too many scary, sharp spots but not so much that it actually distorts what the product, shape and avatar in general look like. Like I said, this is just a small change but in the future we will bring you more tutorials and combined maybe we can all learn together and do some cool stuff! Forgive me if this sucked, I am still learning. xD Let me, Sileny Noel, or any of us here at Free*Style know if there is anything you want covered and, don't forget, there is no such thing as a stupid question!

Worn:
Shape: Quintessencia, 1L
Sweater: Quintessencia, comes with vest (not worn), colors are 50L-100L
Pants: Milk Motion
Skin: Cherry Girl
Hair: Pomme d' Amour
(Hair is worn with bangs from a different hair style by Alice Project)
Nail Polish Layer: RezIpsa Loc
Subscribe to:
Posts (Atom)


